
Choose an Upgrade for Your Current Bottleneck
These recommendations follow each upgrade's direct effect, so your next purchase should depend on how you play:
- Choose Ball Value when you want each cell to pay more. It improves the value of the cells you already produce, making it a useful choice when you are comfortable with your batch size and waiting time.
- Choose Split Speed when most of your time goes into waiting for the next split. Shorter cooldowns let you continue building the batch sooner.
- Choose Capacity when you regularly hit the cell limit and want to hold a larger batch. Extra room helps only if you use it; if you usually sell before reaching your current cap, Ball Value or Split Speed addresses a more immediate need.
For Ball Value vs Capacity, the practical choice is higher value per cell versus room for more cells. Capacity does not raise each cell's value, and Ball Value does not expand the population limit.
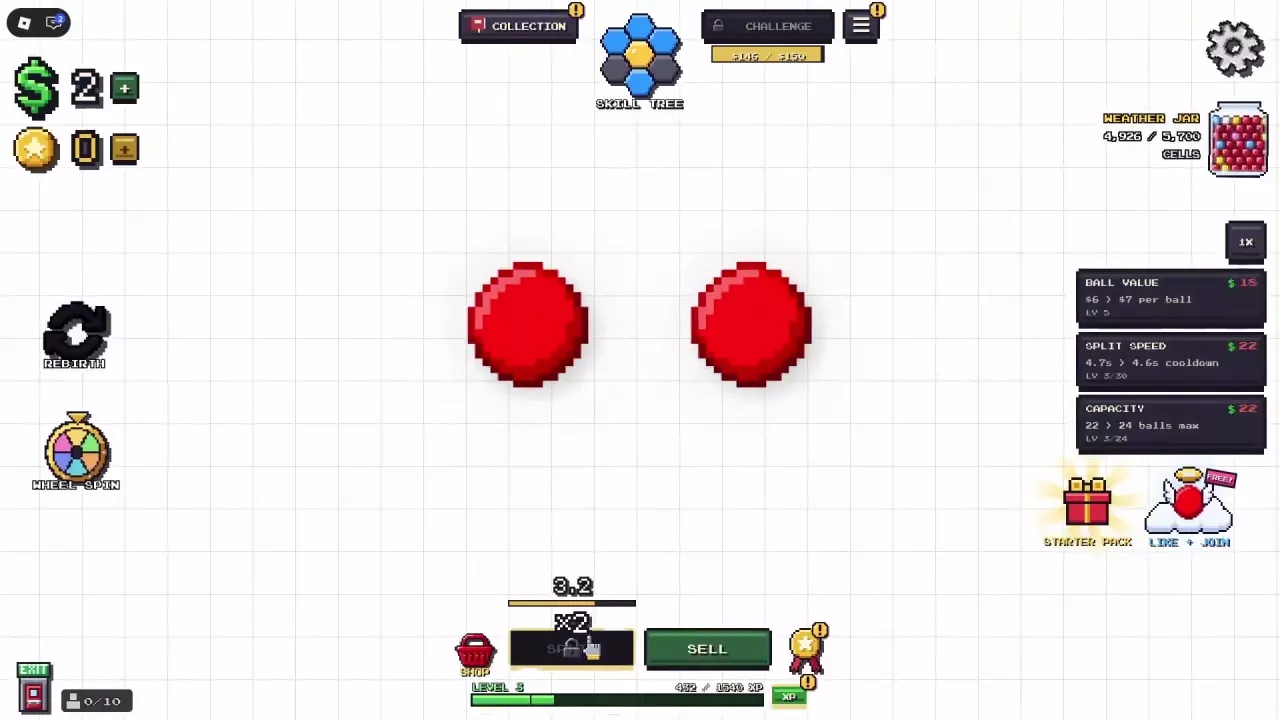
Check the three panels on the right side of the lab. Compare the current effect, next effect and cash price, then buy the upgrade you can afford that addresses your bottleneck. Reassess as your production changes instead of following a fixed purchase order.
For the basic controls, see the beginner guide. For sale bonuses and deciding when to cash in a batch, use the money guide.
Upgrade Levels, Prices and Caps
Use the panel's level and preview together: the current effect belongs to your existing level, while the arrow points to what the next purchase will give you. Prices below apply to the specific level transition listed.
| Upgrade | Level or transition | Panel effect | Cash cost for this transition |
|---|---|---|---|
| Ball Value | Level 1 | $2 per cell | — |
| Ball Value | Level 5 → next level | $6 → $7 per cell | — |
| Split Speed | Level 0 after Rebirth | 5.0-second cooldown | — |
| Split Speed | Level 1 | 4.9-second cooldown | — |
| Split Speed | Level 3 → 4, out of 30 | 4.7 → 4.6-second cooldown | $22 |
| Split Speed | Level 30, MAXED | 2.0-second cooldown | — |
| Capacity | Level 0 after Rebirth | 16 cells | — |
| Capacity | Level 1 | 18 cells | — |
| Capacity | Level 3 → 4, out of 24 | 22 → 24 cells | $22 |
| Capacity | Level 24, MAXED | 64 cells | — |
At level 3, the $22 Split Speed purchase cuts the displayed cooldown by 0.1 seconds; the $22 Capacity purchase adds room for two cells. Choose between them based on whether waiting or available space is limiting you. Check your panel for the price of other transitions.
Reduce Cooldown Beyond Basic Upgrades
Start with cash purchases of Split Speed. Its maxed panel displays 2.0 seconds, but that is the basic upgrade's value—not a universal minimum for every combination of effects.
- 2X Split Speed: This game pass makes splits happen twice as fast through a shorter cooldown and quicker split. It explicitly stacks with the Split Speed upgrade. See the game pass comparison for purchase details and other benefits.
- Speedy Ball or No Wait: The Minimum Cooldown achievement names Speedy Ball or the No Wait card as ways to reach the cooldown floor. Treat these as additional cooldown options rather than assuming the basic upgrade alone reaches that floor. Find No Wait in the card reference.
Use the basic upgrade level to track your cash investment and the active split timer to judge your current wait. The 2.0-second panel value alone does not specify the final cooldown with additional effects.
Rebuild After Rebirth
Rebirth resets Ball Value, Split Speed and Capacity to level 0. Split Speed returns to a 5.0-second cooldown, and Capacity returns to 16 cells.
Plan to buy these cash upgrades again as you rebuild. Start by addressing the bottleneck you notice in the new run, using the same value, waiting-time and capacity choices above.
Before restarting, check the Rebirth reward preview and reset guide to weigh the offer against rebuilding your upgrades.